Setting up a Virtual Environment and VS Code for Kedro
Utilising best software engineering practice with Kedro starts with setting up a virtual environment and an IDE to work with.
This short guide shows you how to get started with Python’s built in venv environment manager together with VS Code to have a Kedro project set up in no time.
I am assuming you have Python 3.7 or greater and VS Code installed. I am using Windows for the prompt examples, for macs/linux replace python with python3 most other commands should be pretty similar - your prompt will look a bit different too. For some distributions you may also need to install venv separatly.
A Virtual Environment
Working with Python can get really painful when you have multiple projects requiring different packages to work correctly. For example project A needs pandas version 1.4.1 but project B uses version 1.5.2, if you use a global Python installation then you will have to chose one of the 2 pandas versions, so only a single project will work correctly. This is where virtual environments help.
The most common environment managers are Python’s built in venv, poetry and conda, but there are quite a few more. If you are working in a team, then you should all use the same environment manager as they can interfere with each other and this way you can also prebuilt common environments. The basic idea how they work is mostly the same: It creates a new folder where all the environment specific files live, you then need to activate the environment or tell your IDE (Integrated Development Environment) which one it should use. Some, like poetry and conda also include a copy of the actual python runtime, venv only manages the dependencies you install.
Let’s dive in, first we will create a project folder:
C:\code>mkdir example-project
C:\code>cd example-project
Now we can create a virtual environment in it:
C:\code\example-project>python -m venv .venv
This will be busy for a little while, but when completed you will see that it has create a new folder with the name .venv. it contains all the modules you will install specifically for this project. You can give it any name you like, but .venv is very common.
Next we will activate it by calling the activate script in the Scripts folder:
C:\code\example-project>".venv/Scripts/activate"
and for Mac users:
source .venv/bin/activate
Now your prompt will have changed and show .venv indicating that the environment is active.
Setting up Kedro and a new project
Next we will install Kedro using pip into our environment:
(.venv) C:\code\example-project>pip install kedro
You can check that it has successfully installed using the kedro info command:
(.venv) C:\code\example-project>kedro info

 _            _
| | _____  __| |_ __ ___
| |/ / _ \/ _` | '__/ _ \
|   <  __/ (_| | | | (_) |
|_|\_\___|\__,_|_|  \___/
v0.18.4

Kedro is a Python framework for
creating reproducible, maintainable
and modular data science code.

No plugins installed
To create a new project:
(.venv) C:\code\example-project>kedro new
And when prompted give your project a name, i.e. kedro-project
This will create a new folder inside your original folder and creates all the templates for the project. Change into the `kedro-project’ folder:
(.venv) C:\code\example-project>cd kedro-project
The last step here is to install all the packages the project needs:
(.venv) C:\code\example-project\kedro-project>pip install -r src/requirements.txt
Hopefully that completed without errors, so let’s jump into VS Code to get this set up.
Setting up VS Code
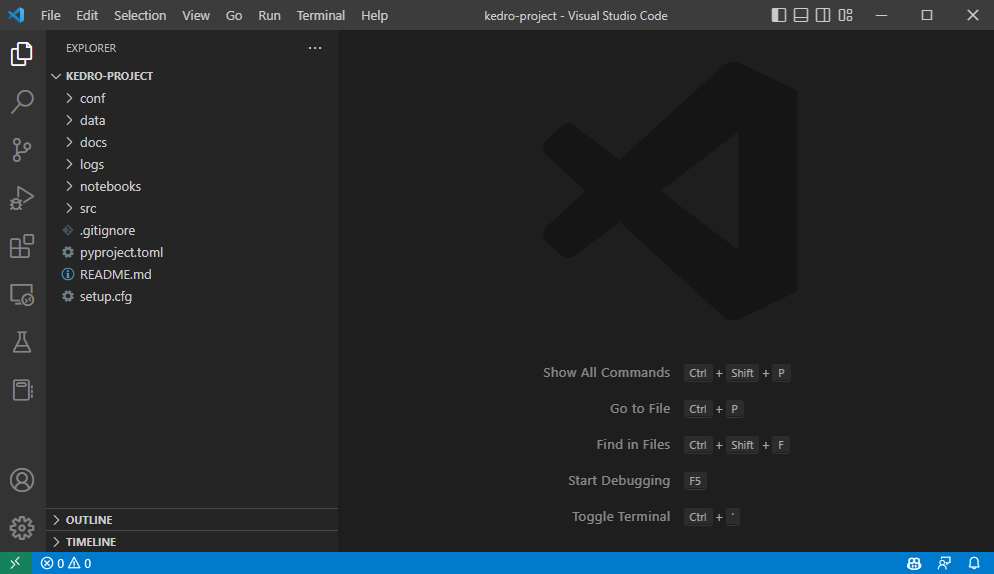
As we are already in the right folder simply start VS Code via (don’t forget the .):
(.venv) C:\code\example-project\kedro-project>code .
VS Code will open with your project as workspace:
Configure your Interpreter
Let’s first set up the Python Interpreter to use our virtual environment:
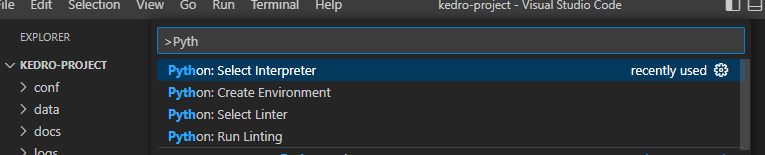
Go to View - Command Pallette or use ctrl + shift + P, then search for Python: Select Interpreter:
You may already have some interpreters listed here, click on + Enter interpreter path..., then use Find.. to navigate back up to the project parent folder, into then select .venv/Scripts/Python.exe (bin/ folder for Mac users).
To confirm, select the file src/setup.py and you will see your environment listed in the bottom right:

Now that the interpreter is configured correctly you can easily run a command line inside VS code. Unselect any items in the explorer on the left and then right-click and open in Integrated Terminal. This will open a new terminal already linked to your virtual environment. You can run Kedro commands straight from there:
The next steps are optional, but still worth doing as they make developing a lot easier.
Set up Linting and Auto-Formatting
If you haven’t yet installed the Python extension, please do that first thing. It will install pylanceas language server for Python. We have already installed flake8, blackand isort via requirements.txt, so let’s see what they do and how to configure them.
These tools statically analyse your code and make suggestions how to improve it, so you have a consistent style throughout your codebase. Why? As we read code a lot more than writing it, we want to make sure all code looks the same and follows the same rules. Easier on your eyes and your colleagues'.
Here some code that runs ok, but doesn’t conform to standard rules of indentation, whitespaces etc.

Now let’s see what flake8 makes of this code:
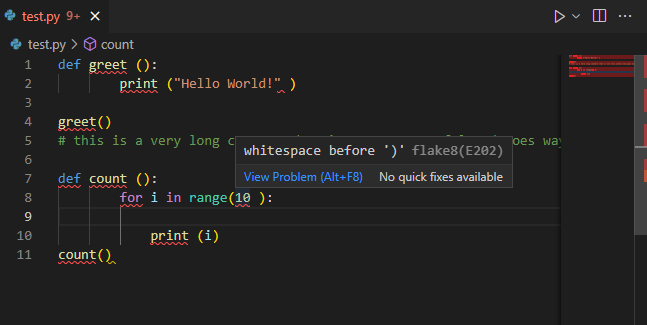
As you can see, quite a few things not up to scratch. To enable linting, go to your Command Palette (ctrl + shift+ P ) and select Python: Select Linter. Choose flake8.
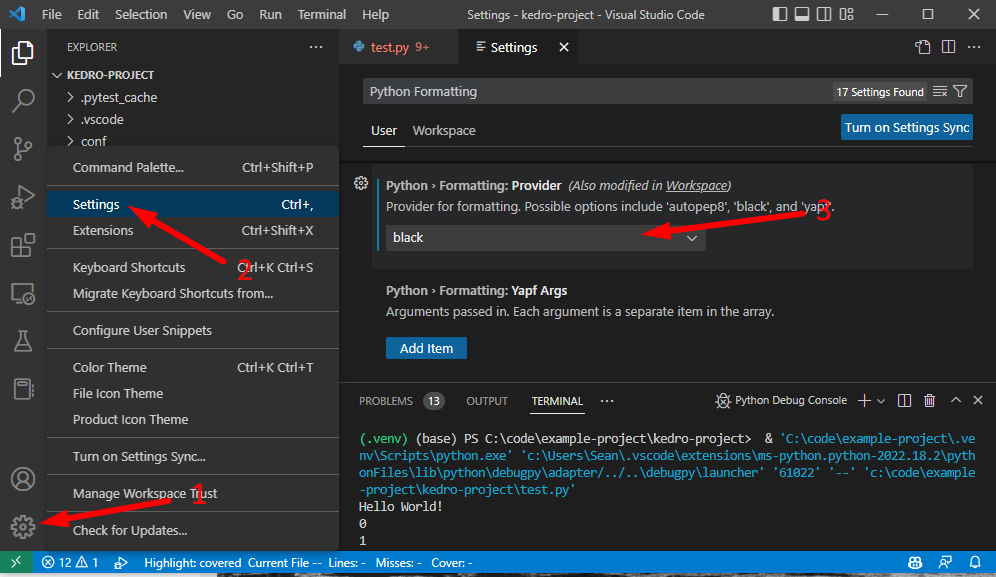
So we could now use the comments to fix those formatting problems, but we can do better by automatically triggering black to do that job for us when saving. Go to Settings and find Python > Formatting Provider and set it to black
Next, find Editor: Format on Save and enable it. Now let’s see what happens on saving the file:
Much better! Now that it is set up, just investigate red and yellow squiggly lines to learn coding best practice. Don’t just ignore it - fix it!
You may have seen that in the Settings dialog there is a User and a Workspace tab. Depending which one you change a setting in, it will apply globally to all VS Code workspaces or just the one your are in, so bear that in mind when setting them up.
Conclusion
These are the basics to set you up for working with Kedro and create maintainable data science pipelines based on software engineering best practice. We have created a virtual environment to isolate projects from sharing the same dependencies and packages. Then we have set up our IDE to run this environment, installed all required packages, and set up linting and formatting.
Why not convert some Jupyter Notebooks into Kedro Pipelines next?
If you want to dive deeper into virtual environments, there are a ton of guides and tutorials out there. Just note that it gets pretty technical very quickly. There is also a lot more you can do in VS code such as set up Debugging, customise auto-complete to help with project settings files or use the built in git client. If you like this guide, leave a comment and which one of those you would like to learn more about.